Scene Time Shader Node

This tutorial was auto-generated by Funkworks.
Adds the missing Scene Time node to the Shader Editor — the same Frame and Seconds outputs you already get in the Compositor and Geometry Nodes.
The Problem
The Compositor and Geometry Nodes editors both have a Scene Time node with two outputs: current Frame, and current Seconds. The Shader Editor does not. If you want a time-driven shader — a UV scroll, a hue cycle, a pulsing emission, a wave that moves with the timeline — your options are clunky:
- A Value node with a manual
#framedriver, retyped on every new material - A Math chain that divides
frame_currentbyrender.fpsby hand - A custom driver script you have to remember to write each time
This addon ports the existing Scene Time node into the Shader Editor with the same two outputs and the same Add-menu location. No new concept to learn — if you have used Scene Time in the Compositor, you already know how this works.
Installation
- Download
scene_time_shader.py - In Blender: Edit > Preferences > Add-ons > Install
- Select the downloaded file
- Enable Scene Time Shader Node in the list
Tutorial
By the end of this tutorial you will have a material on Suzanne whose checker pattern scales over time — driven by the new Scene Time node, without writing a single driver.
What You’ll Learn
- Where to find Scene Time in the Shader Editor add menu
- What the two output sockets mean (Frame and Seconds)
- How to wire Scene Time into any float input (here, a Checker Texture’s Scale)
- How the Seconds output reacts to changing the scene FPS
Prerequisites
- Blender 4.0 or later
- Scene Time Shader Node addon installed and enabled
- A mesh (we use Suzanne — Shift+A > Mesh > Monkey) with a material that has Use Nodes on
Step 1: Open the Shader Editor
In the default startup scene, delete the Cube and add a Monkey (Shift+A > Mesh > Monkey). Right-click to Shade Smooth (optional — gives a nicer surface for the checker pattern). Make Suzanne the active object, change one editor to Shader Editor, and click + New in the shader-editor header to give her a material. The new material starts with a Principled BSDF wired to a Material Output.
Checkpoint: A node graph shows Principled BSDF wired to Material Output; the breadcrumb at the top reads
Suzanne > Suzanne > Material.
Step 2: Add the Scene Time Node
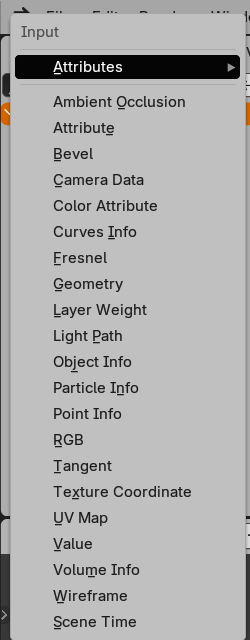
With the cursor over the Shader Editor, press Shift+A to open the add menu. Navigate to Input and click Scene Time.
Checkpoint: A new node titled Scene Time appears under the cursor. It has no input sockets and two output sockets: Seconds and Frame.
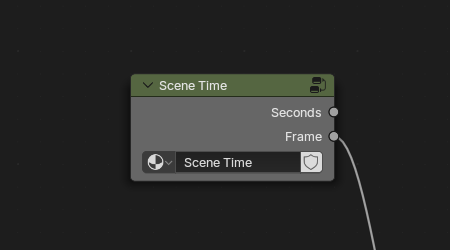
Step 3: Wire Seconds into a Checker Texture
Add a Checker Texture node (Shift+A > Texture > Checker Texture). Connect:
- Checker Color → Principled BSDF Base Color
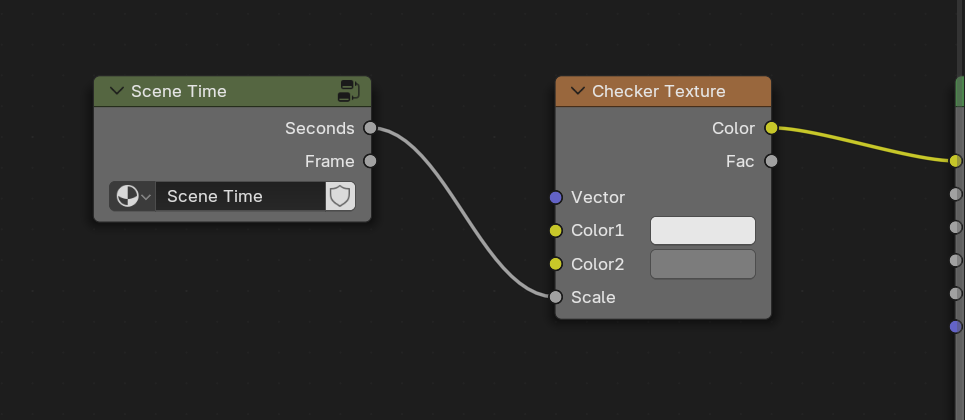
- Scene Time Seconds → Checker Scale
That’s it. Two wires. The checker’s scale is now driven by the timeline — at any
moment, Scale = frame_current * fps_base / fps. Higher Scale means smaller squares.
Press Z in the 3D viewport and choose Material Preview so the result renders live.
Checkpoint: Suzanne now displays a checker pattern. At frame 1 the Scale is ~0.04 (squares so large the surface looks single-colored); scrubbing forward increases the scale and the squares get progressively smaller.
Step 4: Scrub the Timeline
The default Shading workspace doesn’t include a Timeline editor. The fastest fix is to switch to the Layout workspace (top tab bar) for this step — Layout has the 3D viewport on top and a Timeline strip with play / pause controls at the bottom. (If you’d rather stay in Shading, change the File Browser area in the bottom-left to a Timeline editor via its editor-type selector.)
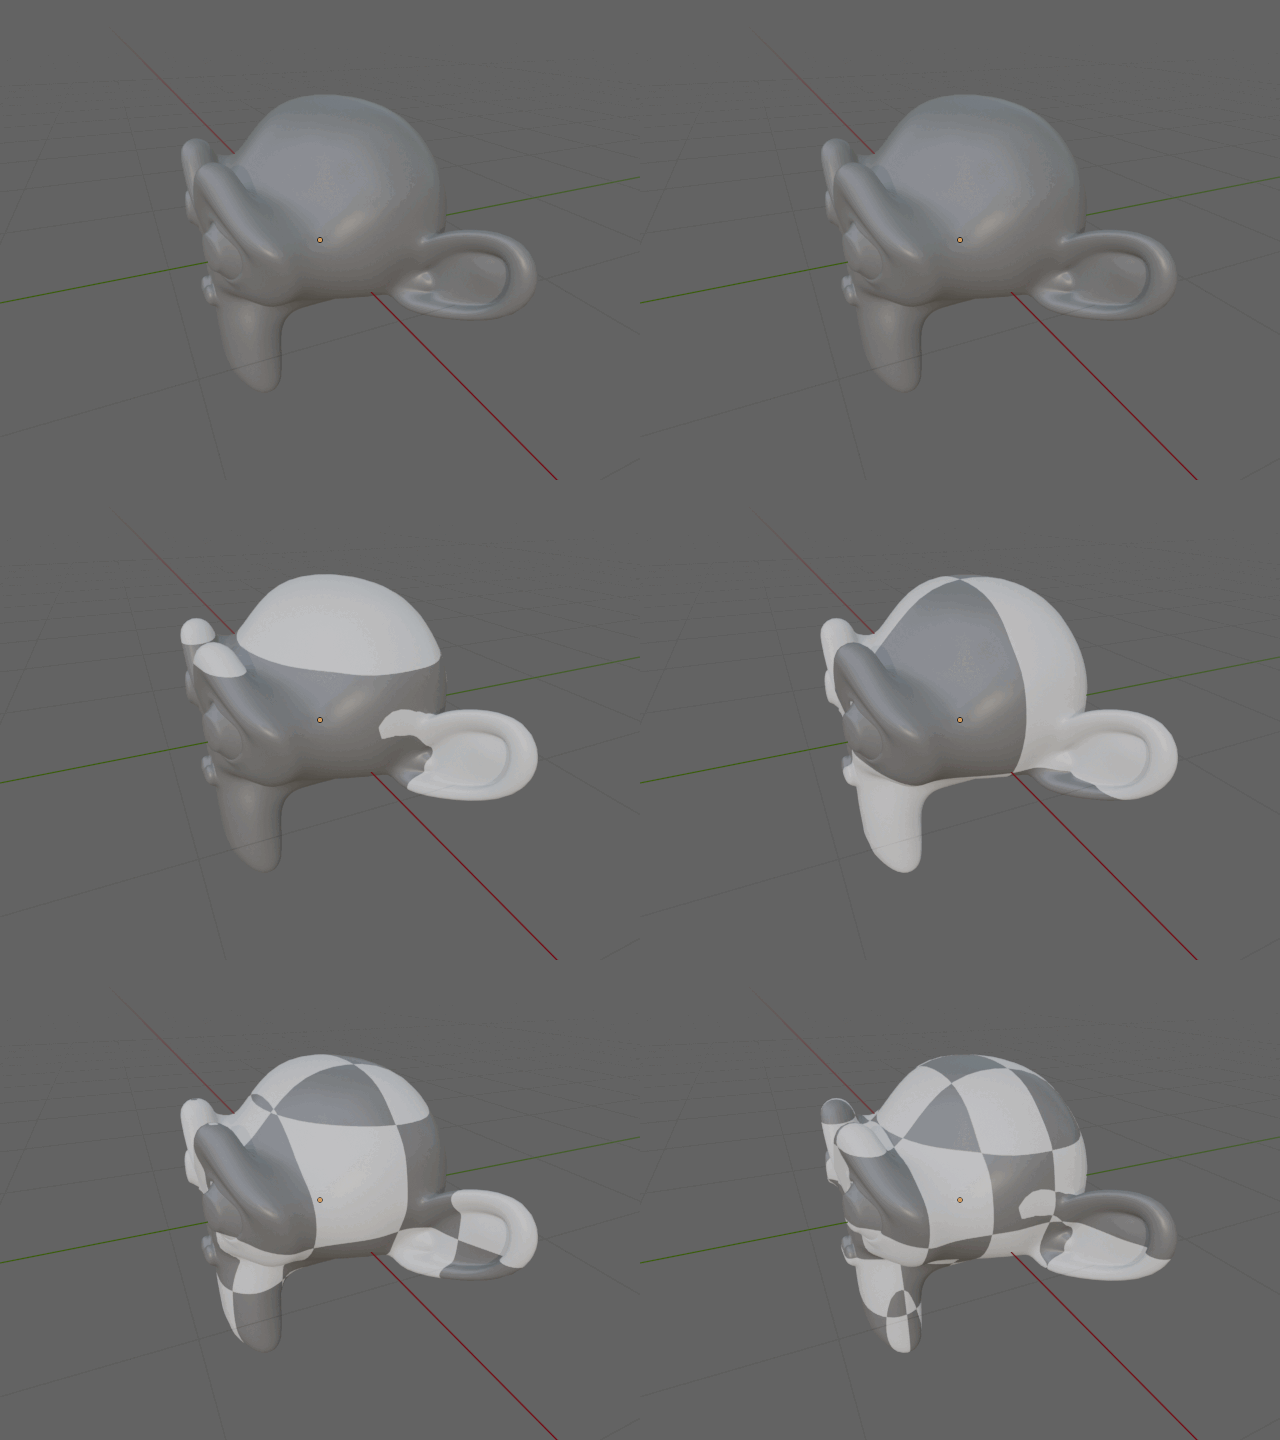
Press the Play button or drag the playhead. As Seconds climbs from 0 to ~5
over the first 120 frames, the checker squares get progressively smaller:
- Frame 1 → Seconds ≈ 0.04 → effectively no checker
- Frame 24 → Seconds = 1.0 → a few large squares
- Frame 60 → Seconds = 2.5 → moderate-sized squares
- Frame 120 → Seconds = 5.0 → fine checkers covering the surface
Checkpoint: The checker squares visibly shrink as the playhead moves forward.
Step 5: Change the Frame Rate
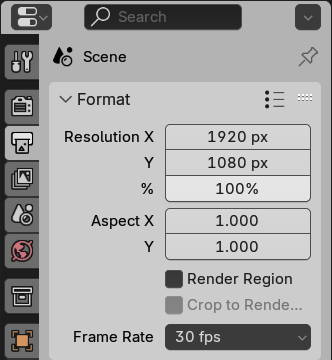
In the Properties editor, go to Output Properties > Format > Frame Rate and change the FPS from 24 to 30.
Without moving the playhead, look at Suzanne again. The checker scale shifts. At frame 60 with 30 fps, Seconds is now 2.0 (60/30), not 2.5. Frame still reads 60 — that output is independent of FPS — but Seconds reflects the new frame rate immediately, and the checker rescales accordingly.
This is the same behaviour as the Compositor and Geometry Nodes versions of Scene
Time: Seconds is frame_current * fps_base / fps, so changing the scene’s frame
rate updates downstream values without re-wiring anything.
Checkpoint: At the same playhead position, the checker squares are larger than they were at 24 fps — Seconds got smaller because more frames now fit in one second.
Step 6: Use Frame Instead
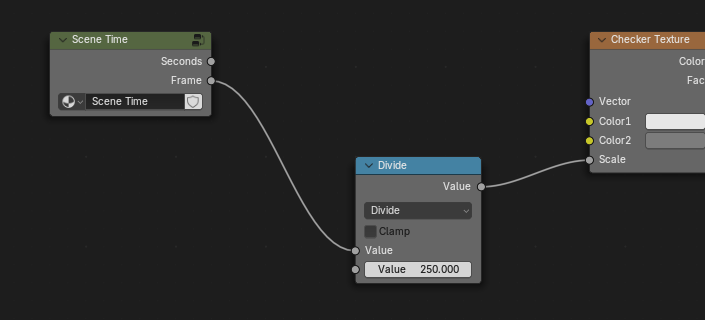
Disconnect Seconds from Checker Texture’s Scale input (Ctrl-drag a line through the connection, or just drag the Scale link off into empty space). Add a Math node (Shift+A > Converter > Math), set it to Divide, plug Scene Time’s Frame output into the top input, and set the second input to 250 (the default end frame of the scene). Wire the Math output into Checker’s Scale instead.
Now the checker scale ramps from 0 at frame 1 to 1.0 at frame 250, regardless of frame rate. Useful when you want the animation to complete in exactly N frames rather than N seconds.
Checkpoint: Scrubbing the timeline through the full 250-frame range smoothly ramps the checker scale from invisible to one large square per face.
Result
You added a Scene Time node, drove a shader input two different ways (Seconds and
Frame), and saw how Seconds responds to FPS changes. Anywhere you would have
written a #frame driver before, you can now drop in this node and connect a line.
Common downstream uses:
- Texture scale ramp (covered above): Seconds → Texture node’s Scale for a growing/shrinking pattern
- UV scroll: Seconds → Combine XYZ → Mapping’s Location input for a moving texture
- Hue cycle: Seconds → Hue/Saturation/Value node’s Hue input
- Pulsing emission: Seconds → Math (Sine) → Mix factor
- Frame-locked transitions: Frame → Math (Divide by total frames) → mix factor
- 4D noise evolution: Seconds → Noise Texture W input for a pattern that morphs in place
Troubleshooting
| Symptom | Likely Cause | Fix |
|---|---|---|
| Scene Time does not appear in the Shift+A > Input menu | Addon is not enabled, or you are in the Geometry Nodes / Compositor editor (which already have their own Scene Time) | Edit > Preferences > Add-ons, search “Scene Time Shader Node”, check the box. Confirm you are in the Shader Editor |
| The node appears but the connected socket reads 0.0 | The material is not attached to anything in the scene’s depsgraph (e.g., assigned but the object is hidden in render) | Make sure the material is on a visible object; drivers on shader node groups only evaluate when the group is reachable from a rendered/previewed material |
| Seconds does not change when scrubbing | Viewport is not previewing live | Press Z > Material Preview or Z > Rendered; the Solid viewport does not re-evaluate shader drivers per frame |
| Linking a material containing Scene Time into another .blend (without the addon) does not work | Trick question — it does work | The drivers travel with the node group as scene data; the addon is only needed to add new Scene Time nodes, not to use existing ones |
Notes
- Read-only. The internal Value nodes are driver-controlled; to override time (e.g., add an offset), wire a Math node between Scene Time and the destination socket and offset there.
- Identical math to built-in Scene Time. Seconds is computed as
frame_current * fps_base / fps, which correctly handles NTSC frame rates (24000/1001 = 23.976 fps). - One group, many instances. All Scene Time nodes you add point at the same underlying group, so the driver setup is paid once per .blend.
- Survives save/reload and linking. The drivers are first-class scene data; opening the file on a machine that does not have this addon installed still works — only adding new Scene Time nodes requires the addon.
Requirements
- Blender 4.0 or later (verified on 4.2 LTS)