All Edge Overlays

This tutorial was auto-generated by Funkworks.
See Crease, Bevel Weight, Seam, and Sharp edge marks all at once — each in its own colour and dash pattern.
The Problem
Blender can display edge-mark overlays — Crease, Bevel Weight, Seam, and Sharp — but only one at a time. The Overlays dropdown exposes them as mutually exclusive toggles. A modeler who marks the same mesh several ways — seams for UVs, creases and bevel weights for the subdivision and bevel passes, sharps for shading — cannot see where those marks overlap or conflict without flipping overlays back and forth and holding the picture in their head.
On a hard-surface mesh this matters. A seam that accidentally lands on a creased edge, or a sharp that should carry a bevel weight and doesn’t, stays invisible until something downstream breaks.
This addon draws all four marks at once, each distinguished by colour and dash pattern, and offsets them into parallel lines wherever they coincide — so an overlap reads at a glance.
Installation
- Download
all_edge_overlays.py - In Blender: Edit > Preferences > Add-ons > Install
- Select the downloaded file
- Enable All Edge Overlays in the list
Tutorial
By the end of this tutorial you will be able to display every edge-mark type on a mesh simultaneously, isolate individual channels, switch between a colourblind-safe and a theme-native palette, and choose how the overlay behaves on dense meshes.
What You’ll Learn
- How to show Crease, Bevel Weight, Seam, and Sharp marks together in one view
- How to read coincident marks as parallel, colour-coded lines
- How to switch palettes, toggle depth occlusion, and pick a performance tier
This addon is pure visualization — it reads edge marks and draws them. It never changes your mesh, pushes an undo step, or appears in a render.
Step 1: Confirm the Addon Is Installed
Open Edit > Preferences > Add-ons and search for All Edge Overlays. The checkbox next to it should be enabled.
Checkpoint: The addon name appears in the list and is checked.
Step 2: Mark Some Edges
The overlay shows marks that already exist on your mesh, so it needs a mesh with at least one Crease, Bevel Weight, Seam, or Sharp edge. If you have a marked model, open it. Otherwise, on any mesh in Edit Mode, select a few edges and apply marks from the Ctrl+E edge menu (Mark Seam, Mark Sharp) and the Edge Data transforms (Edge Crease, Edge Bevel Weight).
The overlay reads marks on the base mesh — the same geometry Blender’s native edge overlays read in Edit Mode — so marks under a Subdivision or Mirror modifier are drawn on the cage, not the modified result.
Checkpoint: Your mesh carries at least one edge mark of any type.
Step 3: Open the Panel and Turn the Overlay On
Press N in the 3D viewport to open the sidebar, then click the View tab. Scroll to the Edge Overlays section and click Show.
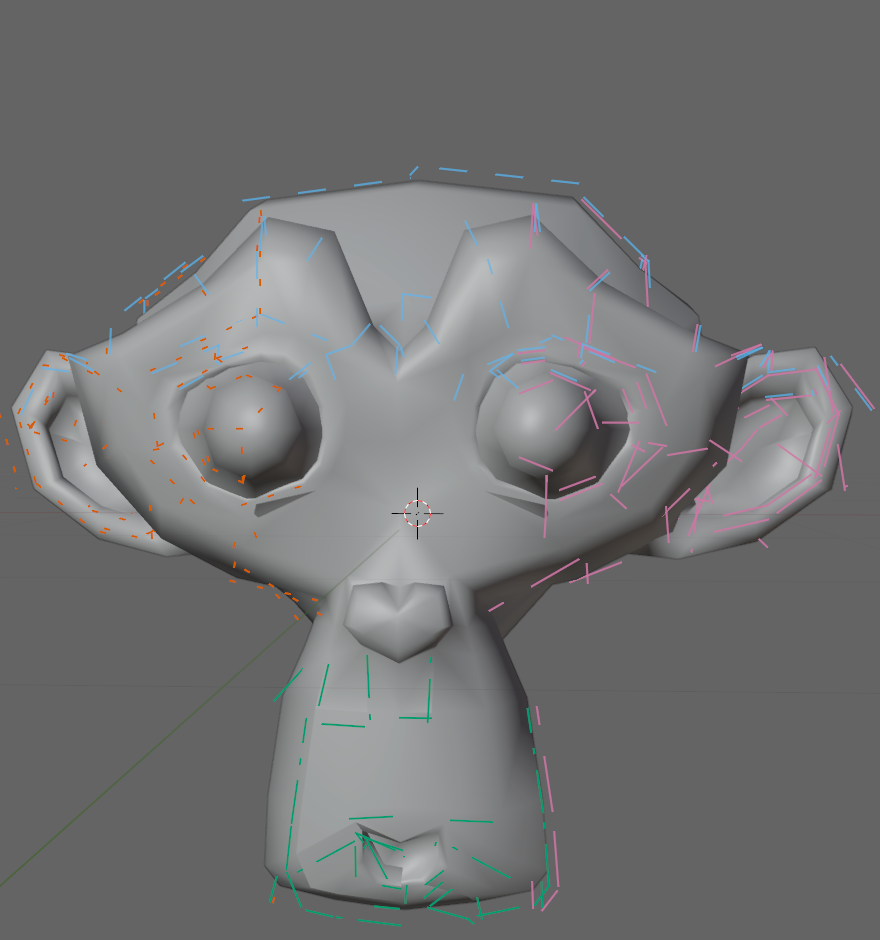
Every marked edge on every visible mesh draws at once, each channel in its own colour and dash pattern:
- Crease — long dashes
- Bevel Weight — even dashes
- Seam — fine dots
- Sharp — dash-dot
Where one edge carries more than one mark, the channels draw as parallel offset lines rather than stacking into a single muddy stroke — the overlap is the whole point, so it is never hidden. For Crease and Bevel Weight, line opacity scales with the mark’s value, so a 0.2 crease reads fainter than a 0.9 crease.
Checkpoint: Marked edges across the mesh are drawn in distinct colours and dash patterns. Disabling Show removes the overlay entirely.
Step 4: Read the Controls
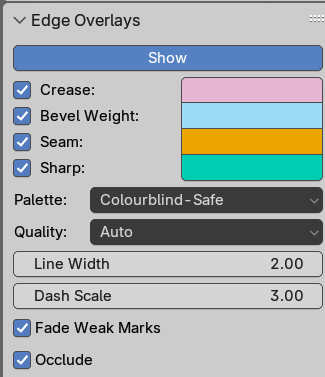
The Edge Overlays panel gives one row per channel — an enable checkbox and an editable colour swatch — plus the global controls beneath them.
- Channel checkboxes isolate a question. Turn off everything except Seam and Crease to see only where those two interact.
- Palette swaps all four colours at once between Colourblind-Safe and Blender Native (Step 6). Each swatch stays individually editable after a preset is chosen.
- Quality chooses how the overlay is drawn (see Notes). Leave it on Auto.
- Line Width and Dash Scale size the strokes and their dashes.
- Fade Weak Marks scales opacity by value for Crease and Bevel Weight; turn it off for uniform opacity.
- Occlude (on by default) hides marks behind front-facing geometry, so they read on the surfaces you see — the way Blender’s native marks do. Turn it off for x-ray (Step 5).
Checkpoint: Toggling a single channel checkbox removes only that channel’s lines; the others stay.
Step 5: See Through the Mesh (Occlude)
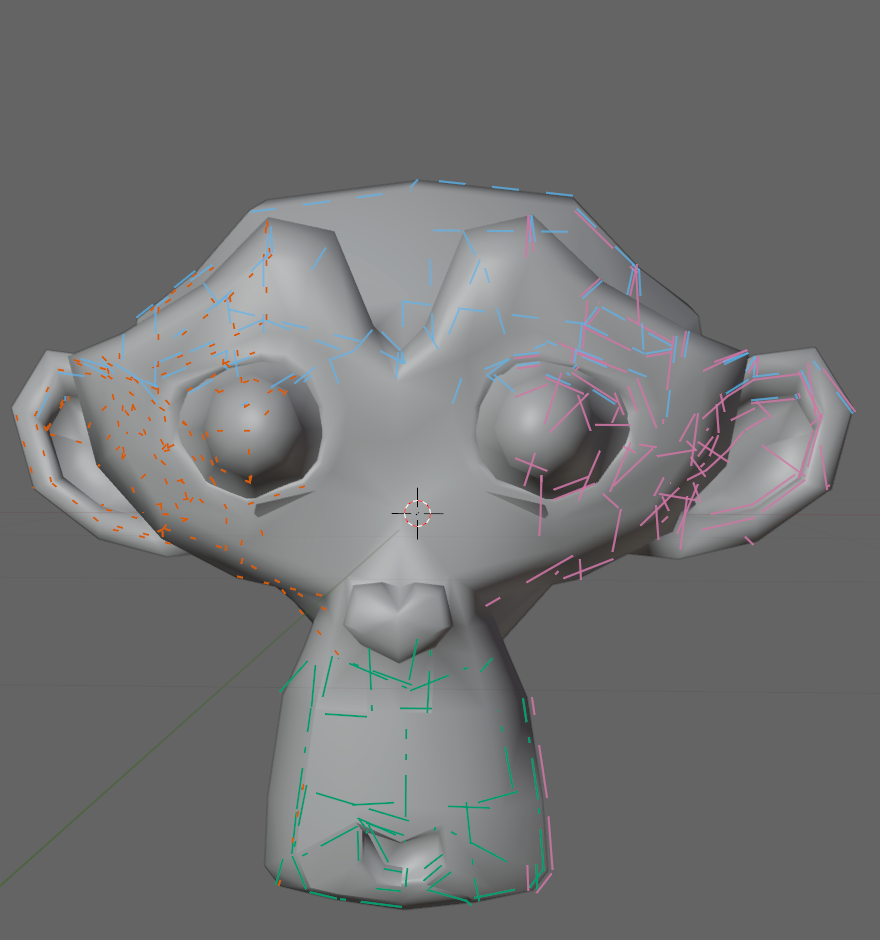
By default the overlay is occluded — marks behind front-facing geometry are hidden, so they read on the surfaces you can see, the way Blender’s native marks do. That keeps a dense mesh legible and is the right starting point for most work.
Turn Occlude off in the panel for x-ray mode. Every mark now draws through the mesh, including edges on the far side and edges that face away from you. This is the mode for catching a conflict you would otherwise have to orbit to find — a seam that landed on a crease around the back of the model shows up where it sits, through the geometry.
Checkpoint: With Occlude on, only marks on camera-facing surfaces draw; turning it off makes every mark visible through the mesh.
Step 6: Switch the Palette
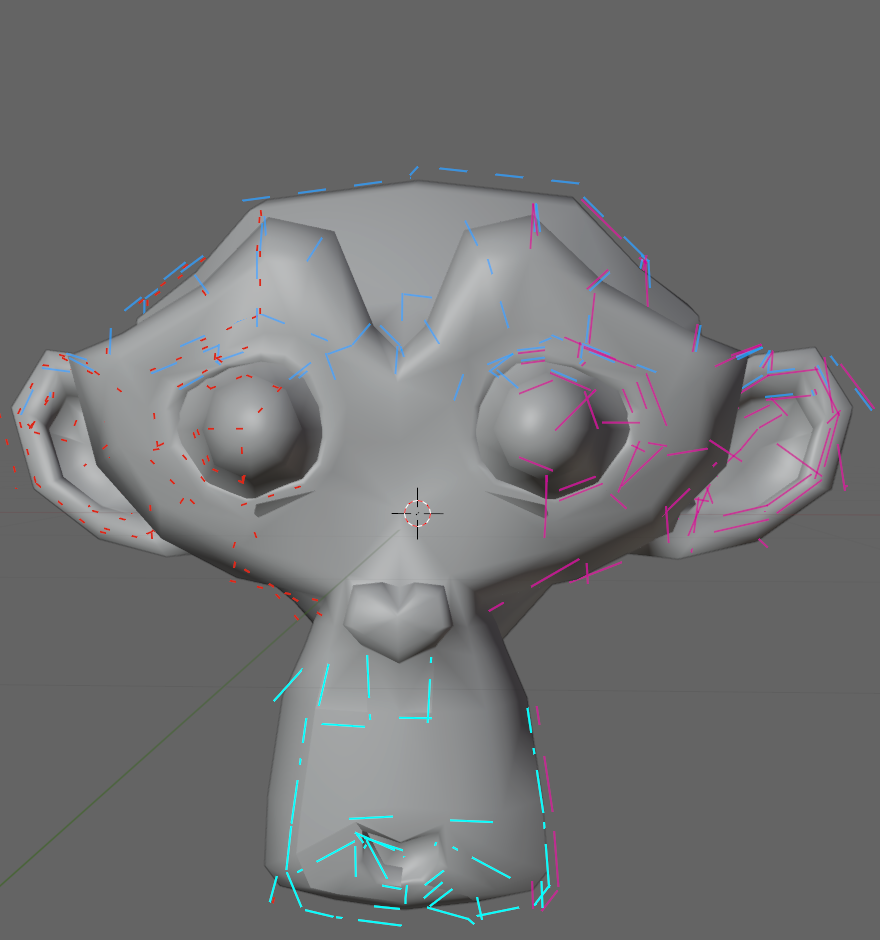
Set Palette to Blender Native. All four channel colours change to match your active theme’s edge-mark hues — crease, bevel, seam, and sharp — so the overlay reads the way Blender’s own marks do. The Native preset is read from the theme, so it follows any custom theme you use.
Set it back to Colourblind-Safe for the Okabe-Ito palette, which keeps the four channels distinguishable for colour-vision-deficient viewers. Either way, you can still click any swatch to override a single channel’s colour.
Checkpoint: Changing the palette recolours all four channels at once; the dash patterns are unchanged.
Step 7: Choose How It Draws (Quality)
Leave Quality on Auto and you can ignore this — it reads the marked-edge count and picks a tier for you. But the three tiers trade crispness against navigation cost differently, and on a capable machine it’s worth knowing which is which. None of them change what is drawn, only how.
-
Balanced rebuilds the dashes every frame in screen space, so they stay pixel-crisp and hold the same on-screen size at any zoom. It looks the best. The cost is per-frame work that grows with the number of marks: smooth on a lightly- or moderately-marked mesh, and slower to orbit on a very heavily marked one. Auto picks Balanced below a few hundred marked edges.
-
Accurate builds the whole overlay once and caches it on the GPU, then redraws that cached batch each frame. Camera navigation stays smooth no matter how many marks the mesh carries — orbiting a model with tens of thousands of marked edges costs the GPU a redraw, not the CPU a rebuild. This is where a strong graphics card earns its keep: the heavier your mark set, the more the cached redraw leans on the card instead of stalling the frame. The trade is that its dashes are world-stable — they scale with the model, so they grow and shrink on screen as you zoom rather than holding a fixed pixel size. Auto picks Accurate above the cutover.
-
Fast does the least per frame — a world-space approximation of the offset and dashing, with no per-segment screen math. It is the option for the weakest hardware, or when you want the overlay to cost as close to nothing as possible.
In short: orbiting a dense, heavily-marked hard-surface model and want it buttery, force Accurate and let the GPU carry the redraw. Want the crispest dashes for a clean screenshot or a lightly-marked mesh, force Balanced. On hardware that is already struggling, Fast.
Checkpoint: Switching Quality changes nothing about which marks appear — only how they are drawn. Auto is the right default; the manual tiers are there for when you have a reason to override it.
Result
Every edge-mark type on your mesh is now visible in a single view, colour- and dash-coded, with overlaps drawn as parallel lines. Instead of cycling the native overlays one at a time and remembering what you saw, you can see a seam crossing a crease — or a sharp missing its bevel weight — directly.
Troubleshooting
| Symptom | Likely Cause | Fix |
|---|---|---|
| No overlay appears | Show is off, the addon is disabled, or the mesh has no marks | Enable the addon, click Show, and confirm the mesh carries at least one edge mark |
| One channel never shows | That channel’s checkbox is off | Re-check the channel in the Edge Overlays panel |
| Marks vanish behind the mesh | Occlude is on (the default) and those edges face away | Turn Occlude off for x-ray, or orbit so the edges face the camera |
| A crease or bevel mark looks faint | Fade Weak Marks scales opacity by value; the mark’s value is low | Raise the mark’s value, or turn off Fade Weak Marks for uniform opacity |
| Dashes change size as you zoom | On heavy meshes Auto uses the cached Accurate tier, whose dashes are world-stable | Set Quality to Balanced for screen-stable dashes |
| Colours are hard to tell apart | The Native palette can be hard for some viewers | Set Palette to Colourblind-Safe |
| Marks appear on the base cage, not the subdivided surface | The overlay reads base-mesh marks, matching Blender’s native Edit-Mode overlays | Expected — marks live on the base mesh, not the modifier result |
Notes
- Pure visualization. The addon only reads edge attributes and draws lines. It never modifies mesh data, pushes an undo step, or shows up in a render.
- Three quality tiers, picked automatically. Auto chooses from the marked-edge count; Step 7 covers what each tier trades and when to override it.
- Settings persist. The panel’s configuration is stored on the Scene and saved with your .blend file.
- Viewport only. Like all Blender overlays, the marks are a viewport aid and do not appear in renders.
Requirements
- Blender 4.2 LTS or later